RCC Environments and their Supply Chain
A workflow that enables you to significantly reduce the risk of supply chain attacks.

Robotmk takes a lot of the work off your hands:
You specify in a configuration file (conda.yaml) which packages your test requires, and the monitored host builds the appropriate runtime environment for Robot Framework itself.
That’s convenient. But it also means that this host downloads code from the internet and executes it – unsupervised, and using the credentials for the applications it is testing.
As part of a client project, I once took a closer look at what actually happens when building such an environment: which packages come from where, where the supply chain holds up and where it doesn’t.
The result wasn’t a security vulnerability – but a realisation that ultimately surprised even me: the most effective lever is a single file. You just need to use it cleverly.
A brief introduction to RCC
RCC was originally developed by Robocorp.
Robocorp was a start-up that aimed to bring the Robot Framework to the cloud.
RCC was intended to provide a stable and idempotent foundation for automation – on the client side (during development) and in the cloud (during execution).
Following its acquisition by Sema4.ai in 2024, the tool was relicensed and is now proprietary; further development of the open-source version has been discontinued.
Since then, Checkmk has maintained its own fork based on the latest open-source version, which is an integral part of Robotmk/Synthetic Monitoring.
(RCC can also be used without Robotmk, e.g. for the local development of Robot Framework automations. However, this article focuses on its use in conjunction with Robotmk.)
RCC can be downloaded via this link: Robotmk Releases
The problem explained in a nutshell
The packages that RCC installs for Robot Framework come from public platforms such as PyPI and npm – where, in principle, anyone can publish anything.
And that is precisely where the problem lies: if a package maintainer suddenly uploads a tampered version, your Robotmk host will automatically fetch that version the next time it builds.
The technical term for this is a “supply chain attack”: the attacker does not attack you directly, but via something you use and trust.
Almost all the known cases in recent years have unfolded in this way.
A concrete example
Here is a conda.yaml file that RCC uses to build a typical environment with Robot Framework, BrowserLibrary and CryptoLibrary:
channels:
  - conda-forge
dependencies:
  - python=3.12
  - pip=23.2.1
  - nodejs=22.11.0
  - pip:
      - robotframework==7.4
      - robotframework-browser==19.14.2
      - robotframework-crypto==0.3
rccPostInstall:
  - rfbrowser init chromium
First, I’ll explain the contents above:
- Python, Pip and NodeJS are downloaded from https://conda-forge.org, a community-driven repository.
- Pip (Python’s built-in package manager) installs the three packages under the
pip:key - In the case of the Browser Library, the final line is added:
rfbrowser initlaunches a Python programme that initialises Playwright, which is based on NodeJS. We’ll look at this in more detail now.
A closer look at dependencies
NodeJS
The PostInstall command rfbrowser init at the very bottom installs, amongst other things, Playwright, which comes with a file called package-lock.json, listing every package with its exact version and checksum.
As all packages are installed with their exact version and checksum, nothing can slip in unnoticed.
Browser binaries
In rfbrowser init, the browser binaries (in this case, only ‘Chromium’) are also downloaded from a CDN.
No checksum is compared at any stage.
Python
Although the conda.yaml file only specifies three Python packages with fixed versions…
  - pip:
      - robotframework==7.4
      - robotframework-browser==19.14.2
      - robotframework-crypto==0.3
…but the final environment contains significantly more.
How can this be?
It’s quite simple: two of the three Python packages use other Python packages in the background. The names of these dependencies and the versions that are installed are defined within the packages themselves – but you cannot see exactly how (e.g. mypackage>=2.1 or mypackage).
This means there is no guarantee that an environment can always be built with the same end result.
As early as tomorrow, a maintainer could release a new version of their package, which in turn would pull in other packages – and one of these packages could be compromised.
This is not a fault of Robotmk or RCC, but a general supply chain issue:
you trust the packages you install, and therefore also the packages that these packages pull in.
The problem: newly compromised packages
A package that has just been compromised and released will not initially be listed in any malware database for a certain time window X.
During this time window, malicious code could theoretically find its way into your environment unnoticed.
To defend against this type of attack, you need a controlled build process that gives you control over the following aspects:
- Time. Do not build environments using brand-new versions. Compromised packages are usually detected within a few days and removed from the repositories.
- The artifact: Once an environment has been built, scanned and ‘frozen’, it cannot be infected by a new malicious package.
The six-step recipe for greater security
In standard operation, each Robotmk host builds its own environment.
This means that each of these hosts downloads the sources itself from PyPI, the npm registry and CDNs.
With five Robotmk hosts, this results in five unsupervised downloads.
I have previously described how to load pre-built environments from a ZIP file in RCC Environments in Isolated Environments – there, the focus was on a solution exclusively for air-gapped hosts with no internet connection whatsoever.
Here, we’re utilising this mechanism as part of a complete workflow that allows you to significantly reduce the risk of supply-chain attacks.
To put it figuratively: the ZIP file into which an RCC environment can be exported does not simply contain the ‘shopping list’, but packs up the fully loaded shopping trolley (including the browser binaries).
When the Robotmk scheduler later recreates the environment from the ZIP file, there is no possibility of malicious code being introduced.
The Big Picture
Before we get into the individual steps, I’d like to highlight the four artefacts that are created in the process.
Each artefact has a specific role and answers a different question:
| Layer | Artefact | Question answered |
| ———- | ————— ———————— | ——————————————— |
| I. The intention | conda.yaml | What do I want to use in the environment? |
| II. the blueprint | environment_<os>_<arch>_freeze.yaml | What exactly should be installed? |
| III. the validation | requirements.txt, package-lock.json | Are the Python/Node packages correct? |
| IV. The final product | hololib.zip | The complete, frozen environment |
Step 1 – Set up a reference system
Reference system = One host per platform, with internet access, as close as possible to the target environment: same OS version, same architecture. The only place where a package is ever downloaded from the internet.
On the reference host, you’ll need:
- A Robot Framework directory containing
robot.yamlandconda.yaml - RCC (Download)
- The
depguard.pyscript (download from Gist) - (optional) OSV Scanner from Google (download from OSV Releases; will be downloaded automatically by
depguard.pyif not already present)
Step 2 – Building the environment
Navigate to the Robot directory and build the environment:
rcc task script --space refbuild --robot robot.yaml -- python --version
This command builds a complete Robot Framework environment, including browser binaries:
rcc task script: Runs the command following the double hyphen--space refbuild(optional, recommended): Instructs RCC not to overwrite the environment in the default namespace.--robot robot.yaml: Specifies the path to the RCC configuration file (which referencesconda.yaml)--: Separates the RCC parameters from the command to be executed in the environmentpython --version: Any command to be executed in the built environment. I have chosenpython --versionhere because it is quick and has no further dependencies.
At the same time, RCC creates a “Freeze” file: this is located in the output subfolder. In this file, RCC has now recorded all transitive dependencies (Python & Node) with their exact versions.
RCC names the freeze file according to the scheme environment_<os>_<arch>_freeze.yaml, where the placeholders stand for the platform on which you are currently building:
<os>= operating system, i.e.linux,windowsordarwin(yes,darwin– notmacos)<arch>= architecture, e.g.amd64
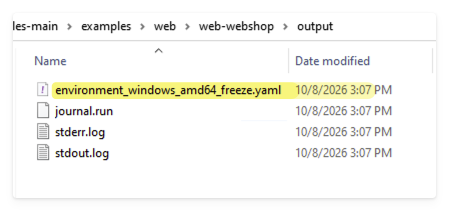
Now move this file one level up into the robot directory (next to conda.yaml).
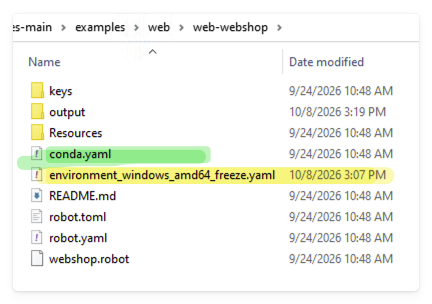
Then open robot.yaml and add the freeze file under the environmentConfigs key before conda.yaml.
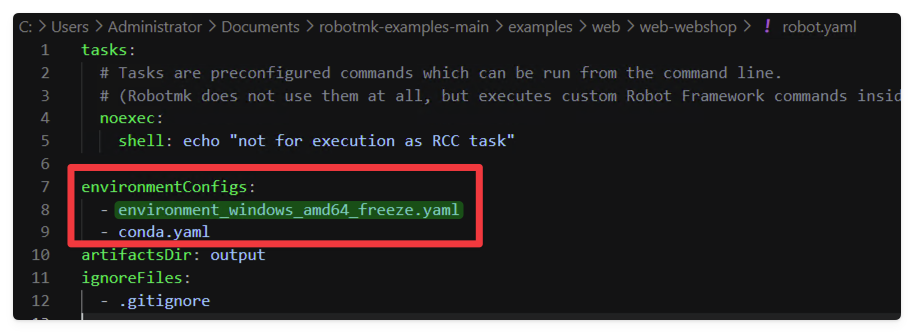
Make sure that
conda.yamlis at the very bottom of the list and that the platform-specific freeze files come before it. RCC uses the file that matches the platform first as its blueprint;conda.yamlis the fallback.
If you also want to use this environment on Linux, simply repeat the entire Step 2 there.
Step 3 – Checking the grace period for Python packages
As a rule, we do not want to load any Python dependencies that are less than 14 days old. Statistically, this already covers the majority of real-world attack windows.
To check this, I’ve written depguard.py. You can download it here.
Place it in the Robot directory and run it directly in the environment using rcc task script:
rcc task script --space refbuild -- python3 depguard.py grace-check
  394 d  ok       cffi 2.0.0
  169 d  ok       click 8.3.3
  192 d  ok       grpcio 1.80.0
  192 d  ok       grpcio-tools 1.80.0
 1206 d  ok       natsort 8.4.0
  984 d  ok       overrides 7.7.0
 1174 d  ok       pip 23.2.1
  407 d  ok       prompt_toolkit 3.0.52
  204 d  ok       protobuf 6.33.6
  253 d  ok       psutil 7.2.2
  260 d  ok       pycparser 3.0
  280 d  ok       PyNaCl 1.6.2
  377 d  ok       PyYAML 6.0.3
  406 d  ok       questionary 2.1.1
  300 d  ok       robotframework 7.4
  239 d  ok       robotframework-assertion-engine 4.0.0
  185 d  ok       robotframework-browser 19.14.2
 2016 d  ok       robotframework-crypto 0.3.0
  265 d  ok       robotframework-pythonlibcore 4.5.0
  491 d  ok       seedir 0.5.1
  255 d  ok       setuptools 80.10.2
  409 d  ok       typing_extensions 4.15.0
  159 d  ok       wcwidth 0.7.0
  259 d  ok       wheel 0.46.3
  216 d  ok       wrapt 2.1.2
The output shows: everything is OK; all packages are at least 14 days old.
What exactly does the script do?
- It creates the checklist by running
pip freeze --alland saving the output torequirements.txt. - It analyses
requirements.txtto identify withdrawn releases (flag:YANKED). A release withdrawn from PyPI is a warning sign. - It returns an exit code > 0 for every finding – so it is scriptable and can also be used in a CI run.
Three switches allow for fine-tuning:
--min-age DAYSchanges the grace period (default 14)-f FILEchecks a different file (this bypassespip freeze)-yanswers all prompts with ‘yes’ if no terminal is available.
What to do if packages are found?
If the script reports packages that have been withdrawn or are less than 14 days old, open conda.yaml and change the package version to the latest version that is older than 14 days. You can check the age of the versions at any time on PyPI.
One might object that by sticking to older versions, you are deliberately overlooking improvements. After all, new vulnerabilities are only patched in newer versions.
However, if you look at the timeline, you’ll see that the grace period of just 14 days protects against unknown, deliberate manipulation. You simply take the latest version that is older than 14 days – and that is practically always a fixed one.
Step 4 – Check for vulnerabilities
Now for the second question: Are there any known vulnerabilities in the packages?
This is answered by Google’s OSV Scanner, which queries the osv.dev database.
And here too, depguard.py does the job:
rcc task script --space refbuild -- python3 depguard.py osv-scan
Without any arguments, it checks both areas relevant to us:
- Python (requirements.txt)
- NodeJS (package-lock.json)
The script expects the
osv-scannerbinary to be in thePATHor in the current directory – otherwise, it asks whether it should download the scanner and verifies the download against the checksum published by Google. (This is ‘nerd mode’ – for an article on supply chains, anything else would be hard to justify. 😄 )
It is worth noting that the package-lock.json file for the Browser Library contains everything the developers need – not what is actually installed on your system.
At the time of analysis, there were 807 entries, of which 722 are marked with "dev": true.
A naive scan therefore checks 90 per cent of stuff that never ends up on a Robotmk host.
depguard.py therefore automatically filters the dev entries out of a copy of the lock file before scanning, and tells you what it has done:
=== osv-scan node: package-lock.json ===
dev dependencies excluded: 722 skipped, 84 scanned (use --dev to include them)
(Use --dev to get the full list if you want to see it.)
That leaves four packages; the vulnerabilities found are genuine: protobufjs (12 advisories), @grpc/grpc-js (4), @protobufjs/utf8 (1) and uuid (1).
Reading the output
Here’s what a result looks like (the Python side, abridged):
Total 2 packages affected by 8 known vulnerabilities (0 Critical, 1 High, 6 Medium, 1 Low, 0 Unknown) from 1 ecosystem.
8 vulnerabilities can be fixed.

+------------------------------- ------+------+-----------+------------+---------+---------------+
| OSV URL                             | CVSS | ECOSYSTEM | PACKAGE    | VERSION | FIXED VERSION |
+-------------------------------------+------+-----------+------------+---------+-------------- -+
| https://osv.dev/PYSEC-2026-196      | 8.0  | PyPI      | pip        | 23.2.1  | 26.1.2        |
| https://osv.dev/GHSA-wf93-45jw-7689 |      |           |            |         |               |
| https://osv.dev/PYSEC-2023-228      | 6.8  | PyPI      | pip        | 23.2.1  | 23.3          |
| https://osv.dev/GHSA-mq26-g339-26xf |      |           |            |         |               |
| https://osv.dev/PYSEC-2026-3447     | 6.1  | PyPI      | setuptools | 80.10.2 | 83.0.0        |
| https://osv.dev/GHSA-h35f-9h28-mq5c |      |           |            |         |               |
+-------------------------------------+------+-----------+------------+---------+---------------+
This looks rather daunting at first glance. Things you need to know to interpret this correctly:
OSV URL: This is where you can read the details of the vulnerability.- Each finding is listed with two IDs, one
PYSEC-and oneGHSA-– these are aliases for the same issue.
- Each finding is listed with two IDs, one
CVSS-Base-Score: The ranges are:- 0.1–3.9 = Low
- 4.0–6.9 = Medium
- 7.0–8.9 = High
- 9.0–10.0 = Critical
ECOSYSTEM: PyPI = Python, npm = NodeJSPACKAGE: Name of the package containing the vulnerabilityFIXED VERSION: Tells you in which version the vulnerability has been fixed.
However, bear in mind that the CVSS is a measure of severity, not of risk. (The score does not know whether your robot calls the affected function at all.)
Step 5 – Evaluate and decide
Zero findings are not the goal – nor are they achievable in an environment comprising Python, Node.js and a browser.
The findings listed above are exclusively in pip and setuptools: build tools that are present in the environment but are not called during the test runtime.
This will never be zero as long as pip is installed.
The requirement is therefore not “no hits”, but “no unrated hits”. Work through the list in this order – CVSS comes last:
- Is the package even installed? This rules out the vast majority on the npm page.
- Does it run at test time or only during build time? This rules out
pipandsetuptools. - Does the bot use this code path?
- Only now CVSS – as the order within the remainder, not as the starting point.
Upgrading versions (Python)
If you decide to change a package’s version, the FIXED VERSION column will show you the target version.
It is highly likely that the package in question isn’t even listed in conda.yaml at all, but is one of the many transitive dependencies.
You should therefore enter the target version in the freeze file.
Example:
- pip:
  - requests==2.31.0      # direct dependency
  - urllib3==1.26.18      # transitive, not mentioned in `conda.yaml`
The freeze file itself tells you which section is the correct one:
- If the package appears above the
- pip:key, it comes from conda-forge: Note that there is only one equal sign here, e.g.openssl=3.6.5. - If it appears below it, it is a pip package: two equal signs, e.g.
cffi==2.1.0.
Tip: Also add the updated version to
conda.yaml, along with a comment. Not because it actually takes effect there, but because this information would otherwise be lost as soon as someone deletes the freeze file and rebuilds.
Again: Theconda.yamlis your statement of intent – a comment such as# CVE fix, see GHSA-...reflects the decision you have made.
Two things to do afterwards:
- Run
depguard.py grace-checkagain after the rebuild to ensure the grace period is observed. - If pip cannot resolve the fixed version because a direct dependency excludes it, you must update the direct dependency, not the transitive one.
Upgrading versions (Node.js)
One drawback: with Node.js packages, you cannot specify which version is installed.
This is specified in the package-lock.json file, which the developers have included with the browser library.
So if the OSV scanner flags any packages in it, you have three options:
- Upgrade
robotframework-browserto a version whose included lock file contains the fix - Assess and accept it – it’s the gRPC bridge between Python and NodeJS, not an externally exploitable attack vector
- Report the vulnerability to the Browser Library maintainers (= pull request on GitHub)
Step 6 – Export
You may need to go through Step 5 several times.
Now export the environment to a ZIP file.
I have already described this process in detail here: Robotmk and RCC Environments in air-gapped environments.
So here is just the short version:
cd web-webshop
set ROBOCORP_HOME=C:\robotmk\rcc_home\current_user
rcc holotree vars --space refbuild --robot robot.yaml
rcc holotree export --robot robot.yaml --zipfile win_rf-web.zip
Naturally, the resulting ZIP file is not checked into a Git repository.
It is a binary artefact that cannot be versioned in a meaningful way.
You can either copy it manually to the target systems, use Ansible for this, or store it on an NFS share to which the target systems have access.
Security is a process, not a state
Of course, this one-off scan is not enough.
How you integrate the process into your own setup depends on your environment.
For inspiration, here is a simple cron job that scans the Python and Node.js packages once a week and sends the results by email:
0 6 * * 1  osv-scanner scan source --no-resolve --config=/srv/robots/foo/osv-scanner.toml \
             -L requirements.txt:/srv/robots/foo/requirements.txt \
             -L package-lock.json:/srv/robots/foo/package-lock.json
You could, for example, use this to create a script that then reports the result to Checkmk via a local check.
In an osv-scanner.toml file, you can also specify, for example, which packages you deliberately accept, and when the assessment expires:
[[IgnoredVulns]]
id = "GHSA-2pr8-phx7-x9h3"
ignoreUntil = 30 November 2026
reason = "protobufjs: the affected code path is not reached by the robot. Assessed on 31 August 2026."
If you want to continue building from the internet
Not every environment needs the ZIP artefact model straight away, and standard operation remains perfectly legitimate: the hosts build themselves and fetch their packages from the internet.
If you take just one thing away from this article, let it be this: Carry out steps 2 to 5 anyway.
The freeze file is the part of the concept that also works when sourcing from the internet – and it really is a bonus.
This alone significantly reduces the risk of a different, malicious package being slipped into your sub-dependencies.
The ZIP file also offers the convenience of always getting exactly the environment that you’ve already built and tested yourself.
Apart from that, you can use two special environment variables to ensure that the browser binaries are available in a common location (outside the environments), or are loaded from an internal server rather than a CDN server:
# Set up browser binaries once; hosts do not download anything else
PLAYWRIGHT_BROWSERS_PATH=/opt/pw-browsers

# or: redirect the download path instead of using the CDN directly
PLAYWRIGHT_DOWNLOAD_HOST=https://<your-own-host>
What the concept does not do
👆 Just so nobody leaves here with false expectations:
- The grace period narrows the window; it does not close it.
- It remains unverified whether the ZIP file on the host is actually the one you created.
- A green scan is a state, not a property; it applies exclusively at the time of the check.
- The freeze file locks in the name and version – not a hash or an index.
A compromised mirror server, an insecurely configured proxy, etc., can still slip a manipulated package past you.
Conclusion
Phew, this article has turned out longer than planned. 😄
It all started with a customer’s question about the correct use of RCC.
The result is (hopefully) not an article designed to scare people, but one that raises awareness of where the supply chain of an RCC environment is resilient and where it isn’t.
Now I’m interested in your perspective: Do you set up your environments on each host – or have you long since centralised this? And if so: what went wrong for you before it finally worked? Drop a comment below or send me an email.