RCC Troubleshooting
RCC is the command line tool used to build Python environments for the Robotmk Framework. The practical advantage of this is that it can be used both during test development and during execution by Robotmk. This ensures that the scripts always run in a reliable environment.
However, errors can sometimes occur when building or activating the environments.
This article summarizes the most common sources of errors when working with RCC and shows how to fix them efficiently.
General errors
Cannot execute rcc / Wrong version number
Problem: rcc version does not run at all or shows a different version than 17.29.1.
Possible causes:
- You have downloaded the binary, but have not renamed it correctly to
rccorrcc.exe. - The binary is in the wrong location.
- The binary is not executable (Linux/Mac)
Solution:
Using the commands which (Linux/Mac) and where (Windows) you can check where the call of rcc resolves to.
Check whether the bin directory is actually contained in the path, restart the shell if necessary.
On Linux/Mac, set the executable permission (chmod +x).
❯ C:\Users\simon_meggle>where rcc
C:\Users\simon_meggle\bin\rcc.exe
❯ which rcc
/Users/simon/bin/rcc
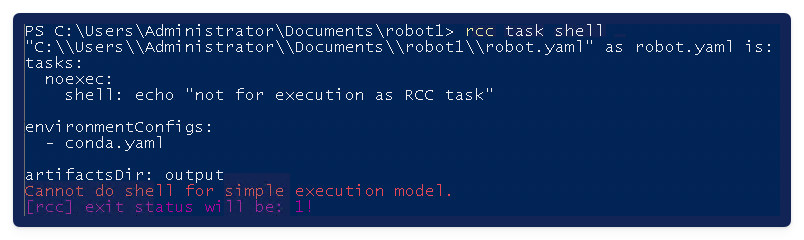
Wrong Shell / Admin-CMD
Error: You are getting Cannot do shell for simple execution model.
Solution: You have probably executed the RCC command in an Admin-CMD/Powershell by mistake. → Use your own user to execute RCC!
Incorrect file extension (YAML vs. YML)
Error: You receive one of these messages:

Solution:
conda.yaml or robot.yaml cannot be found – is the file extension correct? (Often the cause is ‘yml’ instead of ‘yaml’.)
cmd.exe not found
Error: You are getting this error during the RCC environment creation:
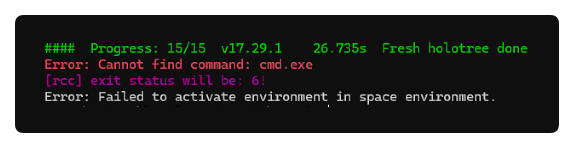
Description: There is an internal Windows problem.
Solution: Try to run the Windows System File Checker tool sfc.
The sfc /scannow command will scan all protected system files, and replace corrupted files with a cached copy.
(Without warranty…, but it worked on one student’s machine… 🤷♂️ )
User Profile with spaces
Error:

Description: For unknown reasons, the user profile must not contain spaces.
Solution: Change the path where RCC should store the environments:
- Define a new environment variable
ROBOCORP_HOMEand assign it a directory of your choice (without spaces). Example:C:\rcc - Start a new CMD and try again.
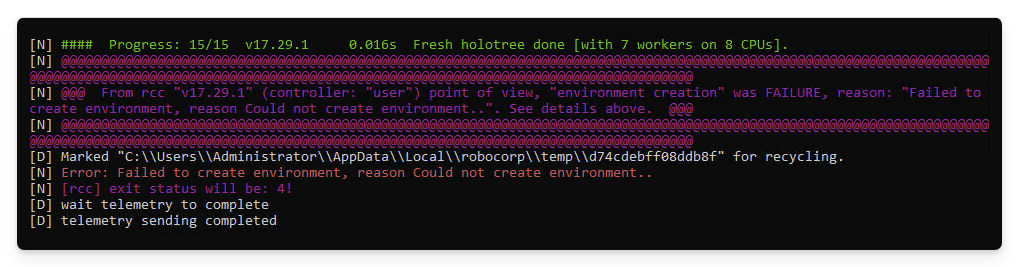
Environment creation
Environment creation fails (Windows, VCRUNTIME140_1.dll)
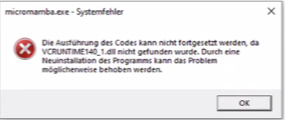
On some Windows systems, the DLL VCRUNTIME140_1.dll is missing (the reason for this is unknown). The tool micromamba used to build the environments aborts the environment creation with a meaningless message:
The cause can be verified by manually executing the tool micromamba.exe listed in the RCC output on the console. If the DLL is actually missing, micromamba generates this error message:
On Windows 11 systems, the error also appears with the error code 0xc0000135:
Fatal [Micromamba [3221225781/c0000135]]: exit status 0xc0000135
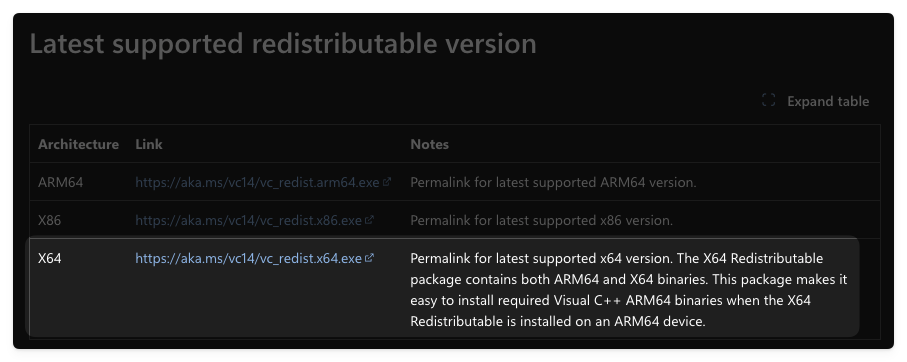
Solution: Install the Microsoft Visual C++ Redistributable from Microsoft—it contains exactly this DLL.
Environment creation fails (Windows, 0x80092012 and 0x80092013)
Error: RCC (micromamba) cannot create an environment on Windows and terminates with the following SSL error:
critical libmamba Several errors have occurred:

Download error (35) SSL connection error [https://conda.anaconda.org/conda-forge/noarch/repodata.json.zst]
    schannel: next InitializeSecurityContext failed: Unknown error (0x80092012)
(Sometimes also with error code 0x80092013)
Description: On Windows, the micromamba used in RCC internally utilises libcurl with the Schannel backend (instead of OpenSSL).
This means: Certificate validation is performed via the Windows Certificate Store and the so-called Windows revocation mechanisms (CRL/OCSP).
When establishing the HTTPS connection, Schannel automatically performs such a revocation check (i.e. verifying whether a certificate may have been revoked).
If this fails – e.g. because the revocation server is unreachable or blocked by network rules – the TLS handshake aborts.
Causes:
- Corporate networks with a proxy / gateway (e.g. Cloudflare Gateway)
- Access to CRL/OCSP servers blocked by the firewall
- Internal or ‘intercepted’ certificates
Important to know:
rcc config diagnosticsmay succeed, as it does not perform a strict revocation check- Other tools may work without issues because they use OpenSSL instead of Schannel or completely ignore revocation errors
- micromamba, which runs within RCC, behaves strictly, however, as Schannel classifies the error as critical!
Solution: Disable certificate revocation checking for micromamba/curl via a system environment variable:
CURL_SSL_NO_REVOKE=1
MAMBA_SSL_NO_REVOKE=true
Then restart the host and try creating the environment again.
(Alternatively: run psexec -i -s cmd.exe and setx /M CURL_SSL_NO_REVOKE=1 or setx /M MAMBA_SSL_NO_REVOKE=true in the system shell to set the variable system-wide.)
Long Path Support
Error: When activating the required LongPath Support with rcc config longpaths -e, this error message appears:
WARNING! Long path support failed. Reason: exit status 1. WARNING! Long paths do not work!

Error executing: rcc.exe configure longpaths --enable
Error code: undefined Error: error Stderr: Failure to modify registry: Access is denied.
Description: Obviously, the Windows machine is centerally managed via Group Policies, which prevents the LongPath support policy from being changed.
Solutions: Ask your administrator responsible for the GPOs to approve this policy:
Local Computer Policy > Computer Configuration > Administrative Templates > System > Filesystem > NTFS > Enable Win32 long paths > Enabled
Restricted Network Access (Proxy)
Error: During the environment creation, RCC fails because of network errors.
Description: RCC requires Internet access to download the installation files and packages.1
If a proxy server must be used, it must be specified in a “Profile”.
Solution:
- First, download the profile template file from here and save it somewhere on your file system.
- Open the file with an editor of your choice and specify the proxy in
http_proxyandhttps_proxy. (Protocol and port also must be included)
Example:
| |
- Next, execute the following commands to import and activate the profile.
> rcc config switch       # show the current profile (default)
> rcc config import -f <file>.yaml     # import the proxy profile
> rcc config switch -p <profile_name>  # switch to the new profile
Switching back to the default profile (= no proxy) is possible withrcc config switch --noprofile.
Note: The approach described above only works if the proxy used allows all domains in principle/as far as possible → this is called a “transparent” or “open” proxy.
So-called “whitelisting” proxies are more restrictive: they have a list of permitted domains; all other data traffic is blocked by default.
If this is the case for you, you must ask the proxy admin to add the following domains to the whitelist:
anaconda.org
conda.anaconda.org
files.pythonhosted.org
pypi.org
registry.npmjs.org
playwright.azureedge.net
playwright-akamai.azureedge.net
playwright-verizon.azureedge.net
github.com
githubusercontent.com
raw.githubusercontent.com
VS Code
Environment cannot be used in VS Code
This error has been occurring since around January 2026.
Error: You have started VS Code correctly from the activated environment (code .), but VS Code still asks for the interpreter. Robot Framework cannot be found.
Description: Recently, in addition to the Python extension for VS Code, another extension called Python Environments has been automatically installed. (This is obviously intended to facilitate the handling of virtual environments – but it does not seem to support RCC environments…)
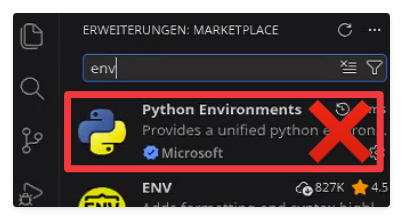
Solution: Uninstall (or deactivate) this extension and then restart VS Code.
Miscellaneous
Using an internal Artifactory server (Nexus, Artifactory, etc.)
Error: RCC cannot install packages because it does not have access to public repositories.
Description: In some organisations, access to public repositories such as PyPI or Anaconda.org is not possible. Instead, internal Artifactory servers must be used to act as proxies.
Solution: In this case, the conda.yaml file must be modified accordingly:
dependencies:
  - python=3.12.3
  - pip=23.2.1
  - nodejs=22.11.0
  - pip:
    - --index-url https://nexusrepo/path
    - --trusted-host nexus_url
    - robotframework==7.2
    - robotframework-browser==19.12.5
(Thanks to Erik Becker, Berlin Airport for reporting this issue and providing the solution!)
I’d be delighted, of course, if you know of any other potential sources of error or solutions that aren’t listed here yet.
Please feel free to use the comments section!
from Checkmk 2.4, also the import of environments as a ZIP file is supported. ↩︎