Don’t just copy, understand: robust selectors for web testing
Why copied selectors are short-lived – and how the 'Accessible Name' makes your tests more robust (and finds accessibility bugs along the way)
My advice right from the start: Stay away ✋ from copied or generated selectors for web testing! In this article, I’ll explain why: because knowing how to define robust selectors is an absolute essential for web testing. Whether or not you understand the art of creating robust selectors makes a huge difference later on when maintaining your tests.
The problem: copied selectors are short-lived
Let’s first take a look at where the problem lies:
You’re in the process of developing a web test and now need a selector for a button.
You open the Developer Tools in your browser, copy the selector…
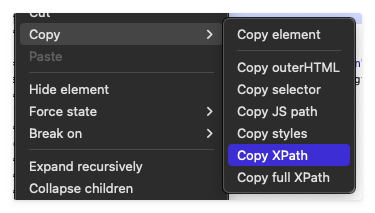
…and – voilà:
/html/body/div[3]/div/div[2]/button
This is what’s known as an XPath selector – a sort of ‘route description’ through the DOM tree, branch by branch.
DOM = Document Object Model. The model the browser uses after it has parsed the HTML source code and converted it into a form it can understand.
Translated, this XPath means:
- Go to the third
divunderbody, - then to the first
div, - then to the second,
- there is the button to click.
This selector works – today. With exactly this version of the page/application.
The problem is that a selector like this is extremely dependent on the structure of the page.
However, the structure is not just invisible to the user.
It is actually irrelevant, because all that matters to them is the visual representation.
The web developer might well insert an additional div tomorrow for whatever reason (a banner, a cookie notice, a layout wrapper, etc.) – and suddenly everything below it shifts:
# no longer works
/html/body/div[3]/div/div[2]/button
# this would be correct
/html/body/div[4]/div/div[2]/button
---------------^
Your test fails immediately and triggers a “false positive” alert.
In Synthetic Monitoring, this means: alerts are sent for no reason, tickets are created, and the on-call team is woken up in the middle of the night.
I often hear that web tests “don’t make sense” in principle, because “something on the page can always change”. When I then ask how the selectors were created, the answers are always the same: copied, generated, I don’t know. Incidentally, test recorders and AI tools often churn out exactly these kinds of selectors like an assembly line.
A change of perspective: from ‘where’ to ‘how’
In this article, I’d like to introduce you to a change of perspective:
Don’t describe where the element is located in the DOM. Describe how a human would describe it.
An example:
You’re explaining to someone how to submit a web form.
- ❌ You don’t say: “Click on the third
div, then on the button inside it.” - 💪 Instead, you say: “Click on Submit.”
Why?
People describe elements in terms of their meaning:
- what is written on a button
- what a button triggers
- what role a button plays.
A term has been coined on the web specifically for this “human” description: the so-called Accessible Name, the accessible name of an element.
It is one of the most reliable anchors you can work with.
Accessible Name: Background
The Accessible Name is the text used to “name” an element for assistive technologies – in other words, what a screen reader reads out to a blind person.
In the case of a ‘Save’ button, for example: ‘Save, button’.
What hardly anyone knows:
The accessible name is not a single attribute. It is calculated by the browser – from several possible sources and in a very specific order.
The browser always takes the first available source in the following order:
aria-labelledby → aria-label → associated <label> → visible text content → title
Important: You don’t need to remember these sources; if you want to carry on reading, skip to the section Why the accessible name is such a good anchor.
I’ve put together some examples below to show what these sources look like in HTML:
1. aria-labelledby
Purpose: Attribute that refers to the ID of another element; its text becomes the name (even overrides visible content):
<button aria-labelledby="lbl">X</button>
<span id="lbl">Close search</span>
=> Accessible Name: “Close search”
2. aria-label
Purpose: text assigned directly to the element, which overrides visible content. Without aria-label, a screen reader would, for example, only say “Button”; with aria-label, this becomes the helpful “Close search, Button”.
<button aria-label="Close search">X</button>
=> Accessible Name: “Close search”
3. label tag
Purpose: a tag that refers to the ID of another element; its text becomes the name (similar to aria-labelledby)
<label for="email">Email address</label>
<input id="email" type="email">
=> Accessible name of the field: “Email address”
4. Visible text
The fallback/standard method for calculating the name automatically:
<button>Save</button>
=> Accessible name: “Save”
5. title
The title attribute of a tag – the fallback option when nothing else is available:
<button title="Save"><svg>. . .</svg></button>
=> Accessible name: “Save”
Why the Accessible Name is such a good anchor
It has three characteristics that set it apart from copied selectors:
- ☑️ It is semantic, not structural.
It describes what the element is – not where it is located.
It is unaffected by a refactoring of the DOM structure or a change to CSS classes.
- ☑️ It describes the user’s intention.
“Close search” is what the user wants to achieve. - ☑️ It is often the only reliable anchor.
Where class names are generated and IDs are assigned dynamically, at least the accessible name remains stable.
Accessing the accessible name using the role strategy
Now for the practical question: how do you actually target the accessible name in a test? It’s worth taking a quick look under the bonnet here. For a long time, I was under the misconception that the Browser Library only had four fixed selector strategies (CSS, XPath, ID and Text).
In fact, the Browser Library passes the selector directly to Playwright, and Playwright comes with a whole range of strategies. (If you want to know the full story: here is a link to the “Selectors” class in the Playwright source code)
Most of these strategies aren’t worth mentioning here – but one is of particular importance: the role strategy.
What does “role” mean?
The role describes what type of element it is: button, link, textbox, checkbox, dialog, navigation … A screen reader reads this out along with the name.
The handy thing is that most roles are automatically derived from the HTML tag:
- A
<button>implicitly has the rolebutton - an
<a href>has the rolelink - an
<input type="text">has the roletextbox - and so on.
Determining the accessible name
You’ll need to think differently here: naturally, nowhere in the HTML source code does it say accessible-name=‘...’.
No wonder, as the accessible name is, after all, a calculated value.
So you can’t simply read it off the page; you’ll have to retrieve it yourself:
Step 1 – Locate the element.
Open DevTools (F12) and locate the element you’re looking for: click on the Element Picker and then on the element on the page. (Alternatively: right-click on the element → Inspect.)
The element is now highlighted in the Inspector/Elements tree.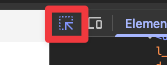
- Chrome/Edge: In the right-hand sidebar (next to Styles, Computed …) click the Accessibility tab. If it’s not visible, it’s hidden behind the
»menu. - Firefox: Via the Accessibility panel. There, click the Accessibility icon (the pointer/person symbol to select) and select the element on the page.
Step 3 – Read the Name and Role.
The browser will now show you in black and white:
Name→ the computed accessible name (exactly what the screen reader reads out)Role→ e.g.button- often even the source from which the name originates (
aria-label,<label>, text content, etc.)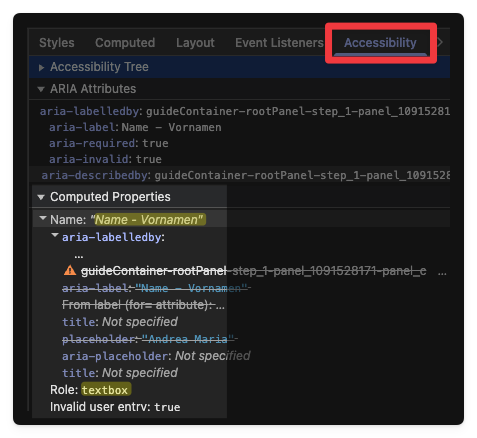
Displaying the calculated Accessibility Name
And with that, you already have both components for your selector: role and name. Instead of copying a fragile path, you read the semantic information that the browser calculates anyway.
Role + Name = what the screen reader announces
Playwright’s role locator now combines precisely these two things – role and accessible name:
Click role=button[name=‘Close search’]
name= matches the calculated accessible name from all sources – regardless of whether it comes from aria-label, from a <label> or from the visible text.
=> And this makes you completely independent of how the developers have set the name.
You could also access the aria-label attribute directly via CSS or XPath:
# works – but only picks out a single source:
Fill Text  [aria-label=“Name - First name”]  Steve      # CSS
Fill Text  //*[@aria-label=“Name - First name”]  Steve  # XPath
However, this only works as long as the name actually comes from aria-label – and fails as soon as a developer changes it to, for example, a <label>, even though nothing changes for the user.
The role locator is much more robust. (Did I mention that already? 😊)
In conclusion: The selector ranking
Of course, even the Accessible Name is not a panacea.
I’d like to (almost) conclude this article with a clear recommendation: it’s best to use selector types in this order.
Important to know: At the very top, I’ve deliberately placed the option that’s closest to the user’s perspective and works without external help – not necessarily the most technically robust.
1) Role + Accessible Name: role=...[name="..."]
- the sweet spot 😊
- semantic rather than structural, as it reflects the user’s intention
- works even without the developer’s help – as long as the page is reasonably accessible
- Bonus: fails exactly when a screen reader user would also fail (more on that in a moment)
Click role=button[name="Save"]
2) Automation IDs: data-testid & Co.
Advantages:
- …unbeatably stable! Created specifically for automation
- language-independent
- not tied to any visible or structural property – so they never change ‘accidentally’
- the default attribute in Playwright/Browser Library is
data-testid(configurable if required)
The following equivalent alternatives are also used:
data-testdata-testiddata-test-id
The only catch: this attribute must be set by the developers. Without their cooperation, this option simply does not exist.
⚠️ Please do not confuse this with the plain id attribute (more on this in point 4): By definition, an id in the DOM is a globally unique identifier – a data-testid, on the other hand, is intended for automated testing and does not need to be unique.
This gives you flexibility: you can check all candidates in the test using a single selector before giving up.
Example:
<button data-testid="save-form">Save</button>
Browser Library:
Click data-testid=save-form
Source: Browser Library: Finding Elements with Automation IDs
3) Text selectors
- exactly what the user sees
- language-dependent
- ⚠️ Caution: By default, Playwright’s text strategy uses partial string matching and is case-insensitive when used without quotes.
Examples:
Click    text=Save      # Partial, case-insensitive – also matches "Save and close"
Click    text="Save"    # Exact match
Source: Browser Library: Finding Elements
4) CSS/XPath on other attributes – and the plain id
Please note that CSS classes are also standard attributes which can change without warning, even if the page itself remains unchanged.
And this also applies to the
id(see point 2 in the list): It feels unique – but it ‘belongs’ to the developers, is often generated by the framework, and can easily be reassigned during refactoring.
Unlike adata-testid, it is not an automation attribute, but rather a random attribute.
👉 So only rely on it if you have agreed with the developers that these specific IDs will remain fixed.
Therefore, only use other attributes if there really is no other stable anchor available.
Click    input[name='email']      # CSS: input with attribute name="email"
Click    div[data-state='open']   # CSS: div with the attribute data-state="open"
Click    id=submit-button         # id: only if guaranteed to remain unchanged
A quick side note: chaining selectors
Almost all the examples above were single selectors.
However, in BrowserLibrary you can also chain several of them together in a string using >> – each step then searches within the match from the previous one:
# Click the Edit button on the line containing "Ada Lovelace"
Click    text="Ada Lovelace" >> role=button[name="Edit"]
This takes the pressure off you to find that one perfect CSS/XPath/Playwright selector: often, two simple, chained selectors will get you further than a single complicated one.
It’s also very handy for specifically narrowing down a data-testid that has been deliberately assigned multiple times, starting from the parent element.
Read more on Browser Library: Cascaded selector syntax
The punchline: Fragility as a feature!
And now the idea that elevates the accessible name from a mere technicality to a philosophy:
Imagine your test fails because role=button[name=‘...’] finds no match – the button has no accessible name.
At first glance, this is annoying: yet another failed test and a selector that needs fixing!
But look at it another way: a button without an accessible name is unusable for a blind person.
So your test didn’t fail because of a testing flaw – it’s just found a genuine accessibility bug! ☺️
Note:
With ARIA attributes, the selector fails precisely when a real user using assistive technology would also fail. 👉 Your test suite therefore checks not only whether the application works – but whether it works for EVERYONE.
Bonus: multilingual tests
If the article had ended there, it would have been misleading:
The Accessible Name is translated text.
“Close search” is, of course, “Suche schließen” on the German page.
If your test runs against both the German and the English versions, a hard-coded name like “Suche schließen” will only match on the German page – obviously.
Variables offer a possible solution here. Here’s a very useful Robot Framework pattern:
Step 1️⃣: Move the language-specific identifiers into separate variable resources. Make sure they end with the suffix _DE or _EN:
variables_DE.resource:
*** Variables ***
${CLOSE_SEARCH}    Suche schließen
# and more...
variables_EN.resource:
*** Variables ***
${CLOSE_SEARCH}    Close search
# and more...
Step 2️⃣: Define a variable ${LANGUAGE} in the .robot file:
*** Variables ***
${LANGUAGE}  DE  # DE= default; override when running with `--variable LANGUAGE=EN`
Step 3️⃣: Load the variable resource using the language variable ${LANGUAGE}:
suite.robot:
*** Settings ***
Resource  variables_${LANGUAGE}.resource  # language-dependent loading of resources
Step 4️⃣: Using the now language-independent identifiers as variables – directly in the role-based locator:
*** Keywords ***
Close search
    Click    role=button[name=${CLOSE_SEARCH}]
To conclude
So let’s summarise: I’m not talking about selector ‘judo’ tricks here, but rather a change of perspective.
So in future, when you’re faced with the choice of quickly copying a selector or briefly reading it off in DevTools: that second click on the Accessible Name won’t cost you a single extra second – but it’ll give you an anchor that’s sure to last longer.
And in the best-case scenario, you might even use it to find bugs that can make life difficult for real people. 💪
Special thanks to René Rohner (Robot Framework Foundation & developer of the BrowserLibrary) for his feedback on this article!
How do you handle this in your test suites – consistently using data-testid, or do you select via the Accessible Name? Or something completely different? I look forward to your comments.